I'm Miss Information
 But I also answer to the name "Meli"...
Adjusting the clutch on a two cylinder tractor with a horizontal engine is pretty easy, and replacing the disks is NOT a major job either!! The following information is taken from the John Deere Model B Operator's Manuals, OM-R2005 and OM-R2006. |
| |
 Through the medium of the clutch on your tractor, the power of the engine is transferred to the transmission. With the simple forward movement of the clutch lever, you engage the clutch, and the power of the engine is transferred to the drive wheels or to the belt pulley.
The adjustment of the clutch determines whether or not you get maximum power developed by the engine to the drive wheels. A loose clutch, one which requires little or no effort to engage, will slip, causing loss of power, overheating of the clutch and pulley, and will result in early replacement of clutch facings.
Adjusting the Clutch. |
Replacing Clutch Facings
|
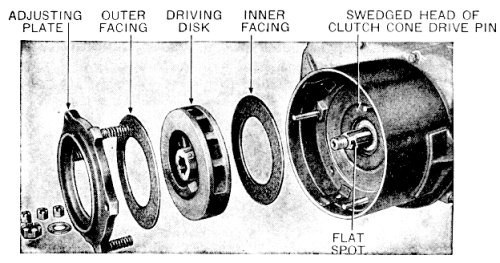
 To replace the clutch facings in the unstyled and the early styled Model B, first study the above illustration, because it shows the arrangement of parts. Be sure that they are replaced in the order as shown.
 Two half-inch machine bolts and nuts can be used as a puller for removing the driving disk from the crankshaft. Caution: Revolve pulley so that ends of bolts do not rest on swedged head of clutch cone drive pin when bolts are tightened. In replacing, be sure rivet in driving disk hub lines up with the flat spot at end of one of the crankshaft splines. The nut holding the driving disk on the crankshaft must be tight. After installing the new facings and all other parts, adjust the clutch as described previously. |
|
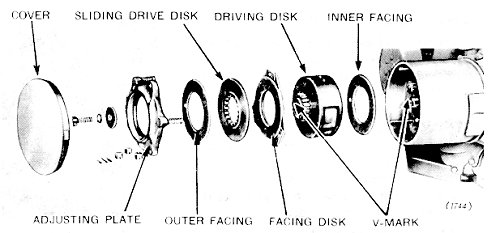
 To replace the clutch facings in the late styled Model B, first study the above illustration, because it shows the arrangement of parts. Be sure that they are replaced in the order as shown.
 To remove the drive disk, you'll have to make a puller, as shown here. In replacing, be sure "V" mark in the driving disk hub lines up with the flat spot at end of one of the crankshaft splines. The cap screw holding the fixed driving disk on the crankshaft must be tight. After installing the new facings and all other parts, adjust the clutch as described previously. |
Go back to the page you just came from......